Mastering the Reverse Searing Steak Method
- Justin Veras
- Mar 23
- 4 min read
When it comes to cooking steak, I’ve found that the reverse searing steak method is a game changer. It’s a technique that brings out the best in your cut of meat, delivering a perfectly cooked interior with a beautifully caramelized crust. If you’ve ever wondered how to get that restaurant-quality steak at home without the guesswork, this method is for you.
I want to share everything I’ve learned about this approach so you can feel confident firing up your grill or stovetop and enjoying steak that’s juicy, tender, and full of flavor. Let’s dive into the details and make BBQ feel achievable and enjoyable in real life.
Understanding the Reverse Searing Steak Method
The reverse searing steak method flips the traditional cooking process on its head. Instead of searing the steak first and then finishing it in the oven or on indirect heat, you start by cooking the steak slowly at a low temperature. Once the steak reaches the desired internal temperature, you finish it with a quick, high-heat sear to develop a rich crust.
This approach allows for even cooking throughout the steak, reducing the risk of overcooking the outer layers while waiting for the center to reach temperature. It’s especially effective for thicker cuts like ribeye, strip steak, or filet mignon.
Here’s a simple breakdown of the process:
Slow cook the steak at a low temperature (in the oven or on indirect heat).
Monitor the internal temperature carefully.
Sear the steak quickly on a hot pan or grill to create a crust.
Rest the steak briefly before serving.
This method gives you more control and consistency, which is why I recommend it for anyone who wants to master steak cooking without stress.

What is the point of a reverse sear?
You might ask, what is the point of a reverse sear? The answer lies in the balance of texture and flavor. Traditional searing first can cause the outside of the steak to cook too quickly, sometimes resulting in a burnt crust and an undercooked center. The reverse sear method solves this by gently bringing the steak up to temperature first.
This slow cooking step allows the heat to penetrate evenly, so the steak cooks uniformly from edge to center. When you finally sear it, the crust forms quickly without overcooking the inside. The result is a steak that’s tender and juicy inside with a flavorful, crispy exterior.
Another benefit is that the reverse sear method reduces the risk of flare-ups on the grill since the steak spends less time over high heat. This makes it easier to manage and less intimidating for home cooks.
How to Prepare Your Steak for Reverse Searing
Preparation is key to getting the best results with the reverse searing steak method. Here are some practical tips I follow every time:
Choose the right cut: Thick steaks (1.5 inches or more) work best. Ribeye, New York strip, and filet mignon are excellent choices.
Bring the steak to room temperature: Let your steak sit out for about 30 minutes before cooking. This helps it cook more evenly.
Season generously: Salt is your best friend here. Season both sides liberally with kosher salt and freshly ground black pepper. You can add garlic powder or herbs if you like, but keep it simple to let the meat shine.
Use a wire rack: When cooking in the oven, place the steak on a wire rack set over a baking sheet. This allows air to circulate and promotes even cooking.
By taking these steps, you set yourself up for success and make the cooking process smoother.
Step-by-Step Guide to Reverse Searing Your Steak
Now, let’s walk through the process step by step. This is how I do it to get consistent, mouthwatering results:
Preheat your oven to 225°F (107°C). This low temperature is perfect for gently cooking the steak.
Place the steak on a wire rack over a baking sheet. Insert a meat thermometer probe into the thickest part of the steak.
Cook the steak in the oven until it reaches about 10-15°F below your target doneness. For example, if you want medium-rare (130°F), pull it out at around 115-120°F. This usually takes 30-45 minutes depending on thickness.
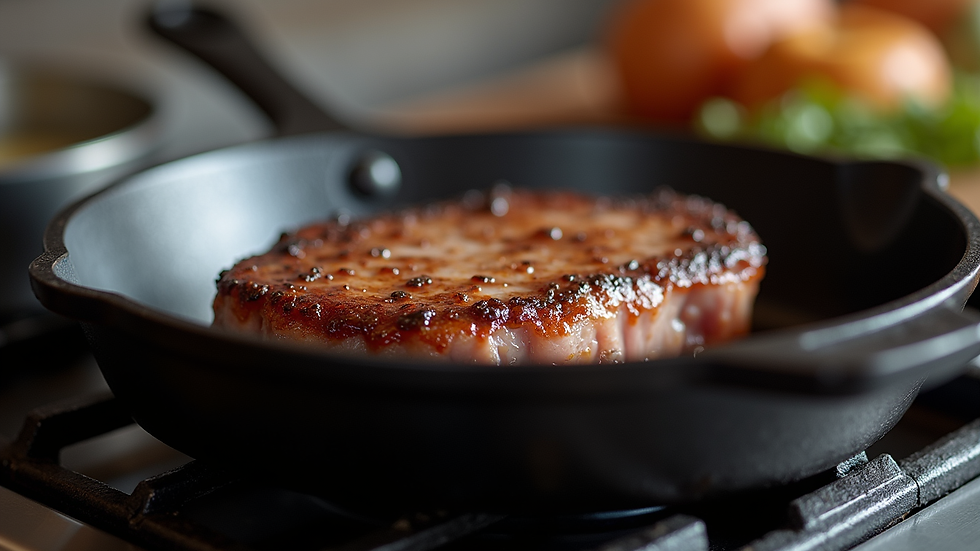
Heat a cast-iron skillet or grill to high heat. Add a small amount of high smoke point oil like avocado or grapeseed oil.
Sear the steak for 1-2 minutes per side until a deep brown crust forms. Don’t forget to sear the edges too.
Rest the steak for 5-10 minutes before slicing. This allows the juices to redistribute and keeps the steak juicy.
This method is straightforward and forgiving, making it perfect for anyone who wants to enjoy steak without overthinking.
Tips for Perfecting Your Reverse Sear Every Time
Mastering the reverse searing steak method takes a bit of practice, but these tips will help you get there faster:
Use a reliable meat thermometer: This is the most important tool for success. It takes the guesswork out of cooking and ensures perfect doneness.
Don’t skip resting: Resting is crucial for juicy steak. Cutting too soon lets the juices run out.
Experiment with seasoning: While salt and pepper are classic, try adding fresh herbs like rosemary or thyme during the sear for extra aroma.
Adjust for thickness: Thicker steaks need more time in the oven. Thinner cuts might cook too fast, so consider traditional searing for those.
Practice patience: The slow cooking step can feel long, but it’s worth it for the even doneness and tenderness.
By following these tips, you’ll build confidence and enjoy the process as much as the results.
Bringing It All Together for Your Next BBQ
The reverse searing steak method fits perfectly into backyard BBQs where you want great flavor without stress. It’s a technique that respects the meat and your time, making it easier to serve steak that impresses without pressure.
Whether you’re cooking for family, friends, or just yourself, this method helps you focus on the fundamentals. You don’t need fancy equipment or complicated recipes. Just good meat, a little patience, and the right technique.
Give it a try next time you fire up the grill or oven. You’ll find that mastering this method makes BBQ feel achievable and enjoyable in real life.
If you’re curious about the basics, here’s a helpful link explaining what is a reverse seared steak in more detail.
With practice, you’ll be proud to serve steak that’s juicy, tender, and full of flavor every time.
Happy grilling!


Comments